
A clean OS installation is useful when starting again or changing Linux distributions. It replaces the installed system; it is not an update that keeps your applications and files.
Reinstallation erases data on the disks selected for formatting. Make an independent, tested backup before continuing. The screenshots show the actual management interface with identifying values removed. Controls depend on your plan, virtualization type and permissions. Reviewed: 15 November 2026.
1. Open the full management panel
- Sign in to your customer portal, open Services, and select the correct service.
- Check its Service ID, hostname and assigned IP addresses. Several servers can have the same plan name.
- Find VDS/VPS Management Control Panel. Read the acknowledgement, select it and click Open full VPS control panel. Allow the new tab if the browser blocks it.
- In the new panel, check the selected server again. If the panel opens its dashboard, use List VPS and the server's Manage control.
Select a screenshot to open it at full size.

The live overview embedded in the billing portal is a read-only summary. The full panel contains the actual reinstall controls and has its own session. Never share the full panel's browser address: it can contain a session identifier.
2. Prepare before opening Install
Download files, database dumps, application configuration, TLS material and recovery keys to storage outside this VPS. Record DNS records and application versions. A backup that exists only on the disk being reinstalled will be lost. Check that you can read your backup and know how to restore it.
Choose a supported OS release compatible with your application. Use only the images actually offered for your server. A distribution logo in a screenshot does not guarantee that every version or Windows licensing is available on every plan.
3. Choose the image and access credentials
Open Install → Reinstall OS. Select the distribution and its exact version in SELECT VERSION. Enter and repeat a new strong password under Password for OS after reinstallation. Store it in a password manager; do not put it in tickets or screenshots. Select an appropriate stored public SSH key if that option is available.
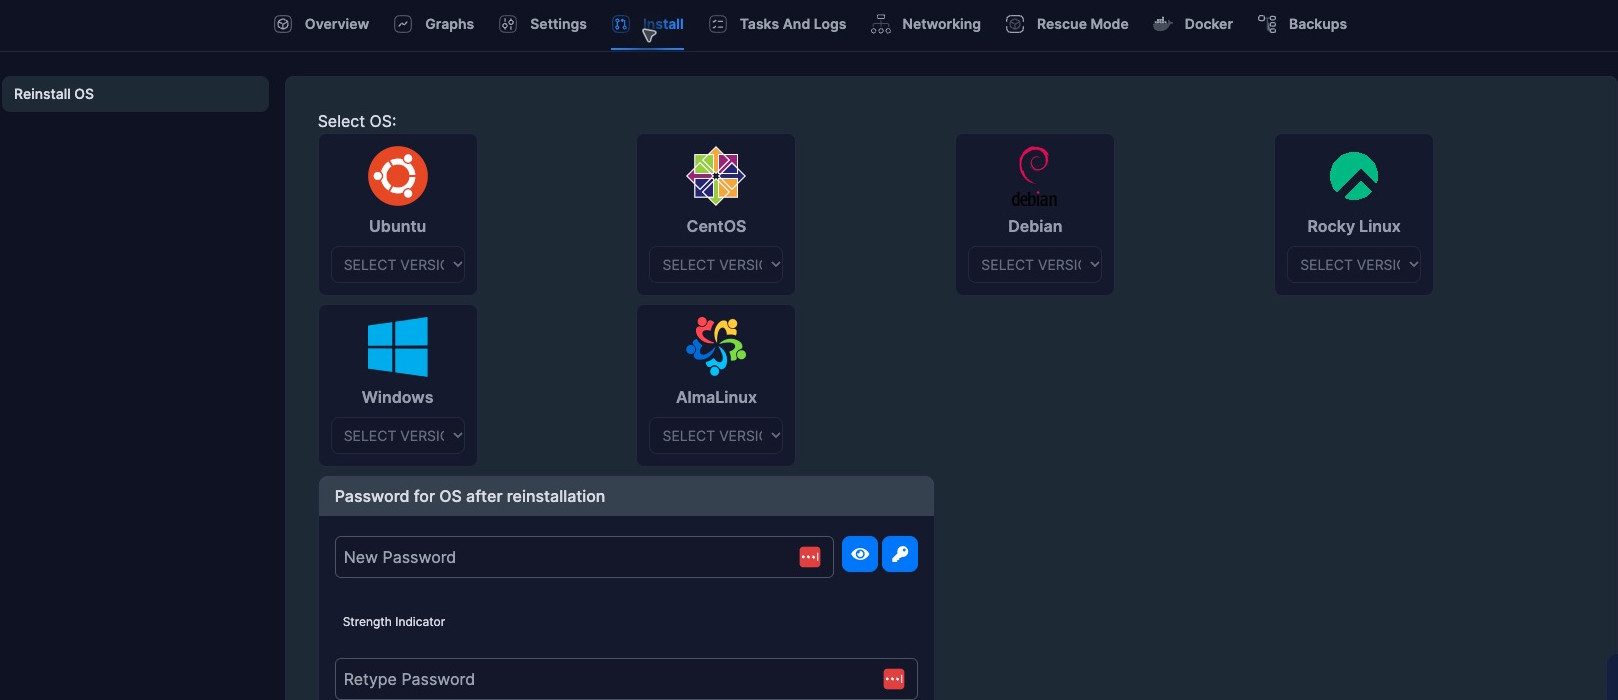
Review the remaining choices carefully:
- Recipe runs optional setup automation. Leave it empty unless you understand the selected recipe.
- Format Primary Disk Only limits formatting to the first assigned disk when supported. It still destroys that disk's contents. Identify every disk and keep independent copies; this checkbox is not a backup.
- Remove old SSH Keys concerns the reinstall's old-key handling. Review your intended host and login keys separately; never assume an old private key is safely stored by the panel.
4. Submit once, then verify
Only when you are ready to erase the selected disk, click Reinstall and read any confirmation. Monitor Tasks And Logs until the job completes. Do not repeatedly submit, force a reboot or change power state while installation is running. A queued or running task is not a completed installation.
After completion, use VNC if needed to confirm boot, then connect using the new OS credentials. Check the installed release, networking, updates and firewall before restoring applications. A new installation can have a different SSH host key. Verify the replacement fingerprint through a trusted console before updating your local known_hosts; do not blindly dismiss an unexpected warning.
If something does not work
If Install is missing, do not try another customer's URL or an API workaround; open a support ticket with your billing Service ID. If a job fails, preserve the task time and error text, without passwords, and ask support before retrying. Reinstalling again will not recover erased files. Recovery requires a usable backup.
Sign out of the full control panel when finished; signing out of the billing portal does not necessarily close that separate session.